Showing posts with label baking. Show all posts

Saturday, 16 March 2024

Orange and rhubarb melting moments from What can i bring? by Sophie Hansen

I'm a huge fan of Sophie Hansen and her latest book 'What can I Bring?' just adds to the collection. Her cooking is one that screams comfort with family and friends at first thought. Even with no where to go, and no one to ask 'what can I bring?' you will find yourself picking it up for inspiration and cooking from it on a regular basis. I have.

What can I bring? by Sophie Hansen | salt sugar and i

It's divided into seasons like her previous books are which I love even though in Sydney you can get pretty much anything, anytime of the year. There is something almost romantic sticking with the seasons. And speaking of seasons, how lovely is today's cooler change?? it's been so hot, I'm starting to wonder if we brought the FNQ climate with us. 

Sophie's books are where I turn to for a comfort cook and this one is the same. I have made two recipes from this book so far with plenty more tabbed. Orange and rhubarb melting moments which are such a special treat and the rice, potato and chorizo pilaf, not a mid week dinner but a goodie for the weekend when you have the time for something to cook away in the oven for a bit of time. I still have a log of the melting moments dough in my freezer waiting to be defrosted, shaped, baked and filled. Yum. The first batch i made, I used raspberry jam as I didn't have any rhubarb jam and it gave them a bit of a monte carlo biscuit feel. I will source the rhubarb jam for the log waiting in my freezer as I think it might make the filling not as sweet and a little more tart. The only 'change' (and very important one I think) I made was, I used icing mixture, not pure icing sugar. Always do and always will when a recipe calls for icing sugar. Life is too short and sifting those pesky lumps out of icing sugar isn't fun.

And although I had no where to go with these delicious morsels, I took them to work and they were demolished happily with only crumbs left on the plate. What more can you ask for?

They would make a great gift or addition to any afternoon tea. Or, simply because you want home made biscuits for yourself. 

Orange and rhubarb melting moments | What can I bring Sophie Hansen | salt sugar and i

Orange and rhubarb melting moments | What can I bring Sophie Hansen | salt sugar and i

Orange and rhubarb melting moments


You can never ever go wrong with a good melting moment. They really do seem to delight everyone, especially with such a pretty pink filling. I like to cook mine a little longer than most recipes suggest so they don't go soggy or too soft. Either way, if you haven't made these before, or for a while, please give them a go. They're such a lovely thing to bring to a picnic, or anywhere. Once the filling is firm and set, they are pretty shelf-stable for a couple of days at least.

Prep time 20 minutes, plus chilling
Cook time 15 minutes
Makes approx. 24

1 cup (250g) unsalted butter, at room temperature
80g icing sugar
Zest of 1 orange
1tsp vanilla paste
1/3 cup (50g) custard powder
1 2/3 plain flour
a pinch of salt

Filling
100g butter, softened
2 cups (250g) icing sugar
3 Tbsp rhubarb or plum jam
1 Tbsp orange juice, plus extra if needed

Place the butter and sugar in the bowl of a stand mixer fitted with the pddle attachment and cream for a few minutes until pale and fluffy. Or you can use a large bowl and an electric mixer. Add the zest and vanilla and beat again. Fold in the custard powder, flour and salt. Turn the dough out onto your benchtop and divide in two, then form each half into a sausage shape. Wrap in plastic wrap and refrigerate for at least 30 minutes.

Preheat oven to 170C (325F) and line two making trays with baking paper.

Slice each sausage of sough into discs around 1 cm thick, and roll these into small balls. Place these on the baking trays, leaving a few centimetres between each to allow for spreading. Gently press down with the tines of a form to flatten a little.

Bake for 15 minutes, or until pale golden. Remove from the oven and leave to cool on a wire rack.

Meanwhile, clean the missing bowl ready to make the filling. Combine the butter and sugar in the bowl of your stand mixer, or using a bowl and an electric mixer, and beat for a few minutes until pale and creamy. Add the jam and the 1 tablespoon of orange juice and mix again until you have a thick paste. Add more orange juice if needed, a little at a time, until you have the right consistency.

Sandwich two biscuits together with a little of the filling and place in the fridge for the buttercream to set, then store in an airtight container for up to 2 days.

Travel advice-
if you're making these biscuits more than 3 days in advance, store them, unfilled, in an airtight container and then sandwich together on the day you plan to share them.

Saturday, 17 September 2022

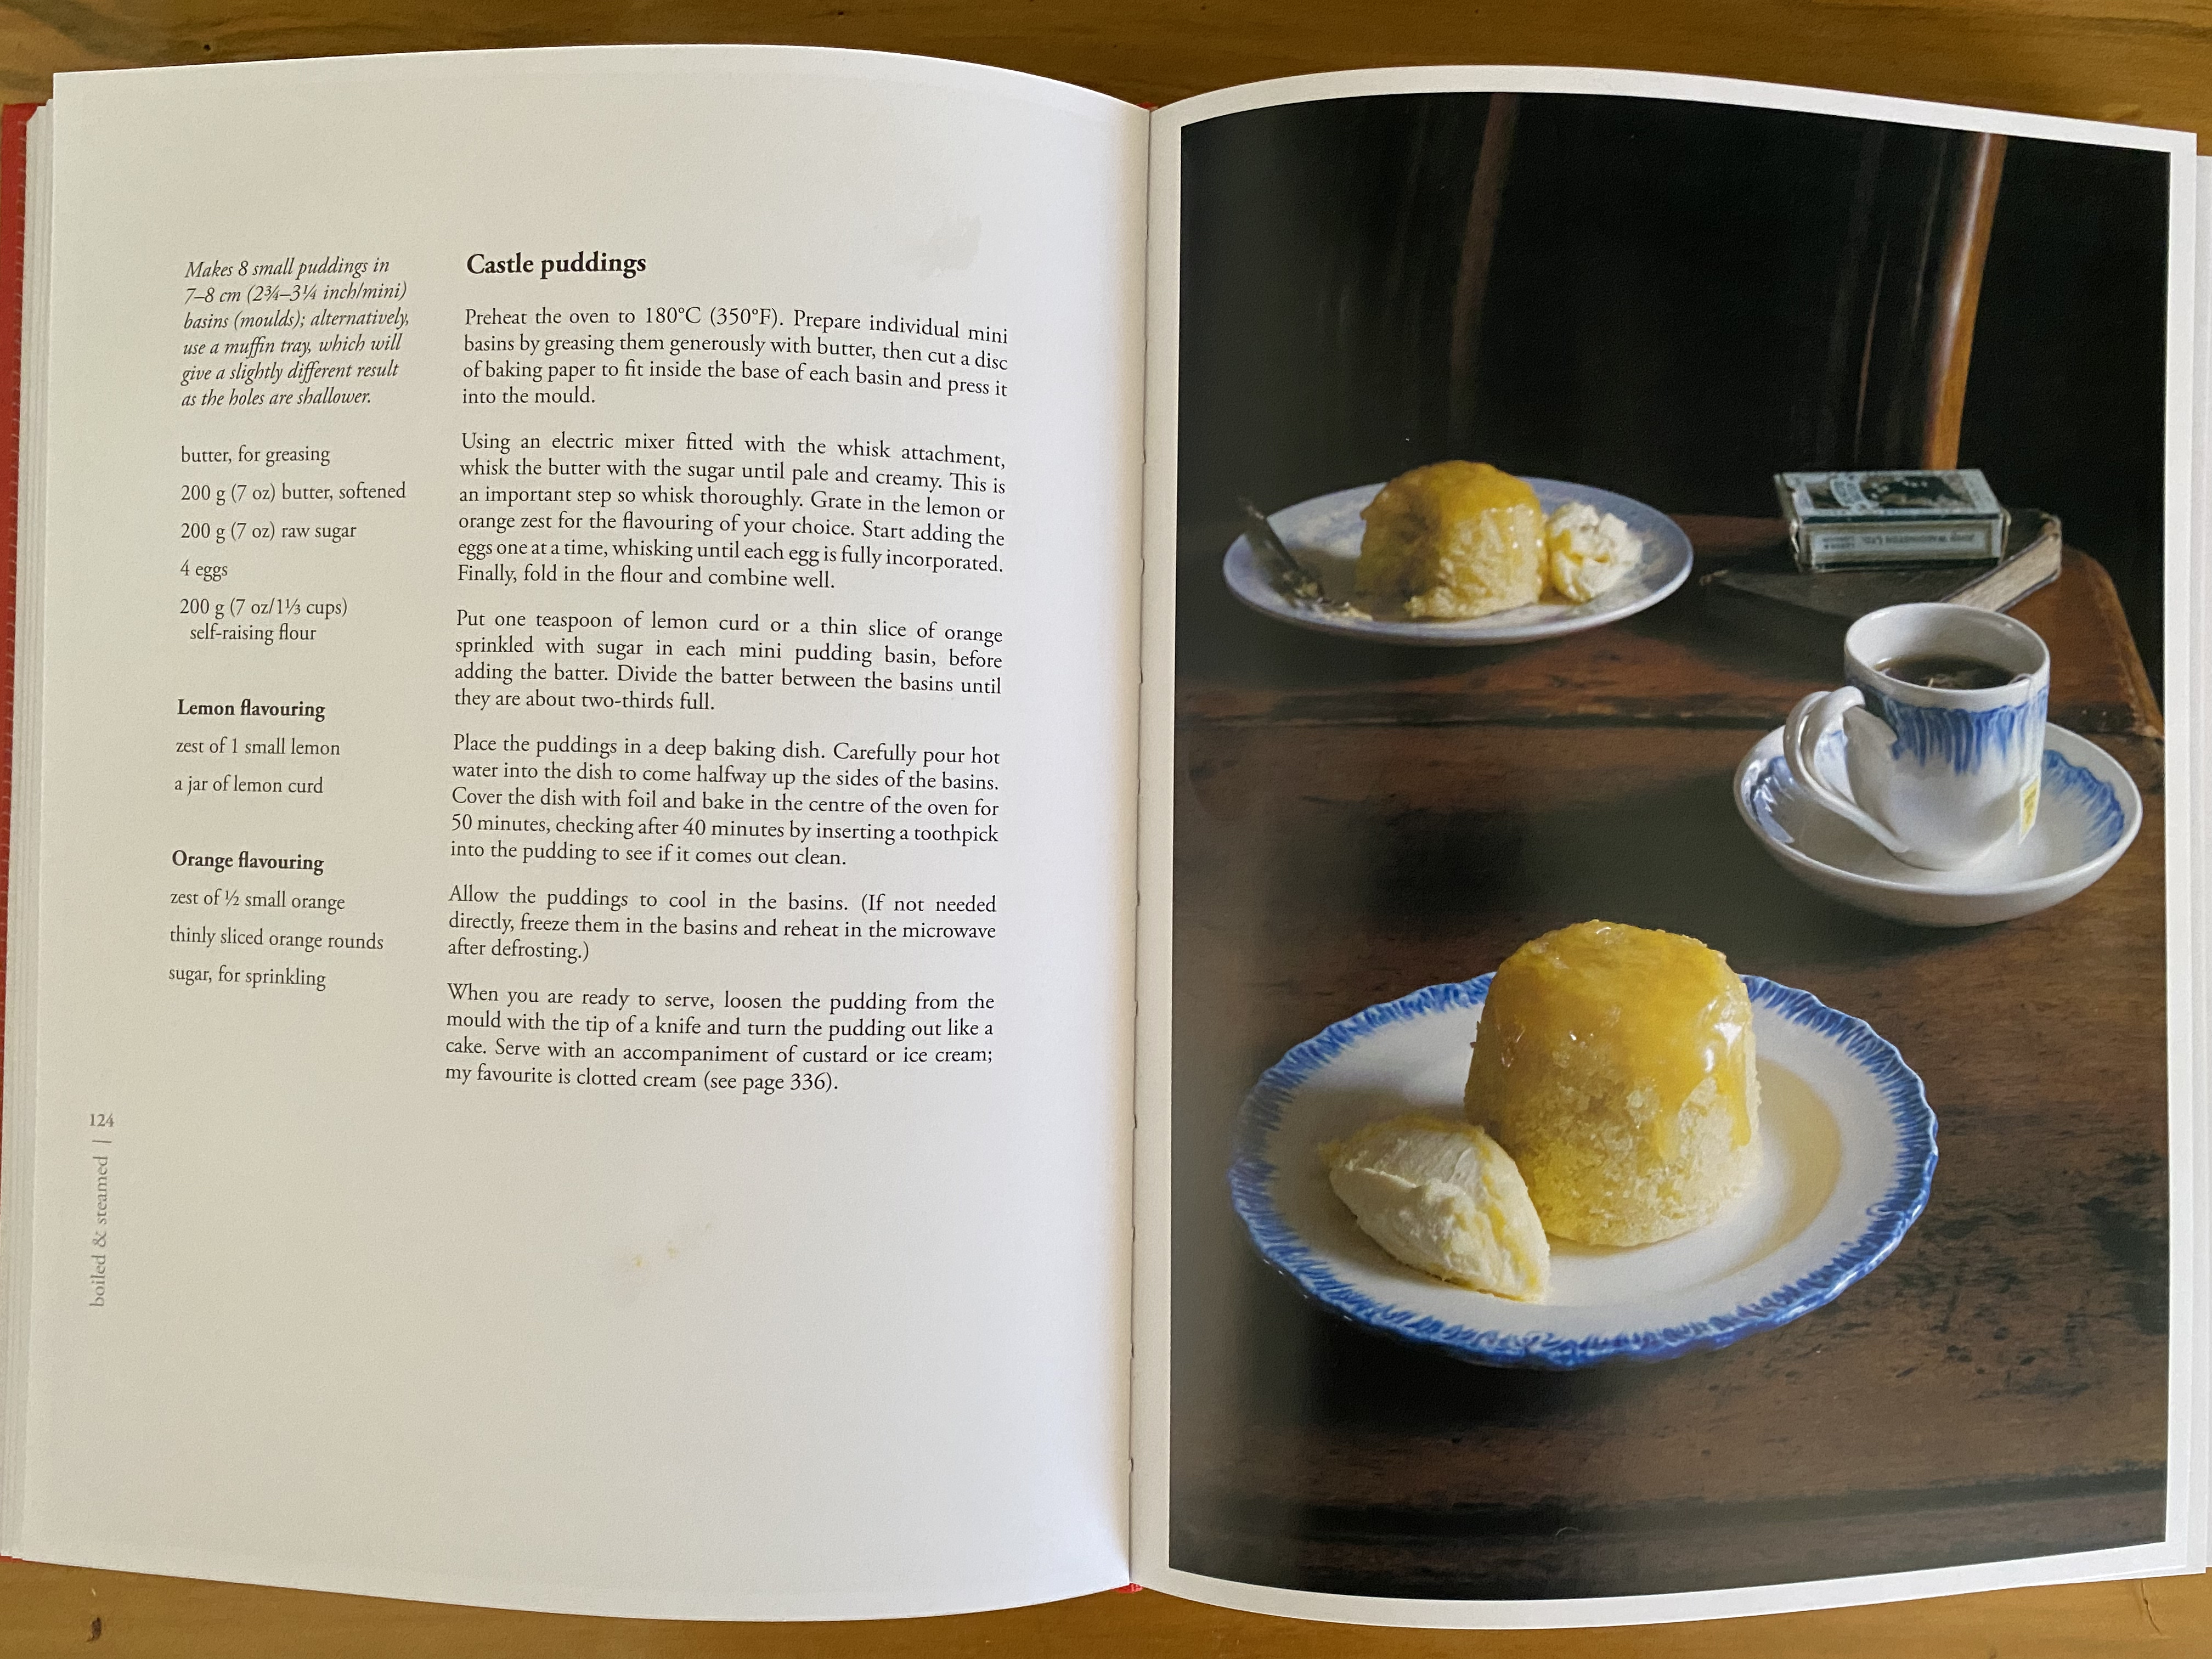
Castle Puddings from Pride and Puddings by Regula Ysewijn

Back in May this year I was kindly sent a copy of Pride and Puddings, the history of British puddings, savoury and sweet by Regula Ysewijn from Murdoch books. And goodness me, if you are a pudding lover, this book is for you. For me, the word 'pudding' really makes me miss the cold weather where you get to rug up on the couch after dinner with a bowl of steamy pudding and cold ice cream or coming in from a cold day out and sitting down to a homemade chicken pie with peas. Thats not to say there isn't cold 'pudding' recipes in this book, there are. It's jammed back with recipes which remind me of Downtown Abby times like trifles, bakewell pudding, beef pudding, blood pudding, toad in the hole, bread and butter pudding, fritters, jellies, fools and burnt creams.

Being in the tropics where it's summer all year round did not stop me making a hot pudding, Castle Puddings, which are a type of steamed pudding. Steamed puddings hold a soft spot in my heart. When I still lived at home after high school when my only 'adult' responsibility was my phone bill, I'd get these ideas that making dessert at 9pm on a Tuesday was a brilliant idea. Mum didn't mind as long as the kitchen was clean and Dad was always up for it because he never said no to anything I cooked and he had a sweet tooth. Steam puddings, aka college puddings, was one of the things I made on rolation. The recipe I used back then was an old Australian Womens Weekly recipe where you put jam in the bottom of mugs and boil them on the stove in a water bath. This particular recipe for Castle Puddings that Regula Ysewijn has in her book uses lemon curd or thinly sliced oranges in the bottom and steamed in the oven in a baking tray of water.

In true FNQ fashion, I did not have oranges or lemon curd on hand, instead, I used the strawberry jam we had in the fridge instead. And even though I did not make these at 9pm on a weeknight, they felt like a complete treat and brought back memories of a lighter time. 

‘Images and text from Pride & Pudding by Regula Ysewijn, photography by Regula Ysewijn. Murdoch Books RRP $55.00.’  


‘Images and text from Pride & Pudding by Regula Ysewijn, photography by Regula Ysewijn. Murdoch Books RRP $55.00.’  

*notes on the below: I used 1 teaspoon of vanilla extract instead of lemon.orange zest and a few heaped tablespoons of jam instead of lemon curd/orange slices.*

Castle Puddings

Steamed lemon or orange sponge puddings

Recipe from: Pride and Puddings by Regula Ysewijn.

Makes 8 small puddings in 7-8 cm basins (moulds); alternatively use a muffin tray, which will give a slightly different result as the holes are shallower.

butter, for greasing
200g butter, softened
200g raw sugar
4 eggs
200g self-raising flour

Lemon flavouring
zest of 1 small lemon
a jar or lemon curd

Orange flavouring
zest of 1/2 small orange
thinly sliced orange rounds
sugar, for sprinkling

Preheat the oven to 180C (350F). Prepare individual mini basins by greasing them generously with butter, then cut a disc of baking paper to fit inside the base of each basin and press it into the mould.

Using an electric mixer fitted with the whisk attachment, whisk the butter with the sugar until pale and creamy. This is an important step so whisk thoroughly. Grate in the lemon or orange zest for the flavouring of your choice. Start adding the eggs one at a time, whisking until each egg is fully incorporated. Finally, fold in the flour and combine well.

Put on teaspoon of lemon curd or a think slice or orange sprinkled with sugar in each mini pudding basin, before adding the batter. Divide the batter between the basins until they are about two-thirds full.

Place the puddings in a deep baking dish. Carefully pour hot water into the dish to come halfway up the sides of the basins. Cove the dish with foil and bake in the centre of the oven for 50 minutes, checking after 40 minutes by inserting a toothpick into the pudding to see if it comes out clean.

Allow the puddings to cool in the basins. (if not needed directly, freeze in the basins and reheat in thee microwave after defrosting.)

When you are ready  to serve, loosen the pudding from the mould with the tip of a knife and turn the pudding out like a cake. Serve with an accompaniment of custard or ice cream; my favourite is clotted cream.

Saturday, 16 April 2022

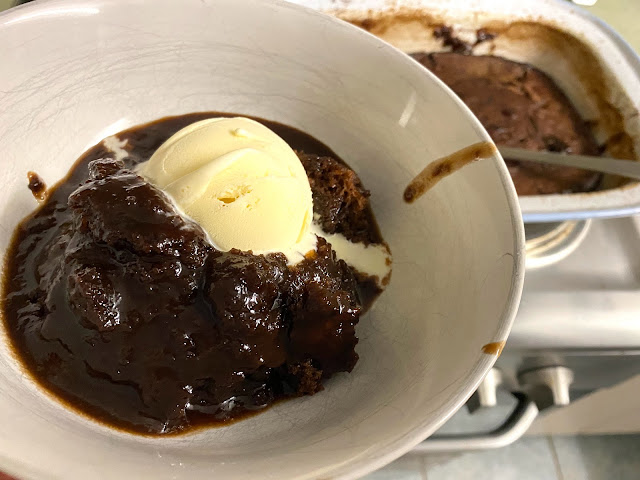
Whisky & Orange Chocolate Self-Saucing Pudding from The Comfort Bake by Sally Wise


Whisky & Orange Chocolate Self-Saucing Pudding from The Comfort Bake by Sally Wise | salt sugar and i blog

When you move into a new home it can take a little while before home feels like home. Sometimes you need a good hug from a friendly face and something warm and decadent to treat your self. Lucky for me I have recently had both. The something warm and decadent came first.

A couple of weeks ago I was sent Sally Wise's new cookbook 'The Comfort Bake'. This is the kind of book where you go oooo, ahhh, yummm, oh I want that, I'm hungry. And then if you're like me you rustle around your pantry and work out you have everything you need for a gooey self saucing chocolate pudding and all you're missing is ice cream. Which, luckily, the new home is right around the corner from the servo.

This gooey self saucing chocolate pudding I made has an offical name, Whisky & Orange Chocolate Self-Saucing Pudding. Have you skipped down to the recipe and are you rustling around your pantry yet? 

It's a recipe that you just have to trust Sally and follow her simple instructions without too much thought. It will work. I find most self-saucing recipes really test my trained background because everything about me says that pouring 300ml of boiling liquid over a cake batter means it will turn into soup, but it doesn't. The cake batter cooks and rises through the hot liquid which turns into a spoon licking chocolate sauce you can't get enough of. You don't end up with undercooked cake batter which you aren't sure if it's meant to be sauce or cake  or a bit of both (I am not a 'lick the beaters' kind of baker). You very much get a rich warm pudding and a chocolate sauce that goes perfectly with some vanilla ice cream or double cream. It's a perfect recipe for the cooler nights where you find yourself on the couch, curled up watching season 2 of Bridgerton. May I even say, it's been positively 'cold' up here in FNQ... perfect!

Every recipe in The Comfort Bake screams home, warmth, love and full bellies. From the Very Ginger Gingernuts biscuits which I cannot wait to bake, to the Plum Crumble Cake which Sally says can easily be serves as a dessert with custard or the Savoury Pull-apart Loaf which is high up on my 'to-bake' list. They are recipes which will make you happy.

Whisky & Orange Chocolate Self-Saucing Pudding from The Comfort Bake by Sally Wise | salt sugar and i blog
‘Images and text from The Comfort Bake by Sally Wise, photography by Samuel Shelley. Murdoch Books RRP $39.99.’

Whisky & Orange Chocolate Self-Saucing Pudding


Serves 4–6

While a chocolate self-saucing pudding is always a favourite, this recipe takes the concept to a whole new, supremely delicious, level.

For the sponge
150 g (5½ oz) self-raising flour
pinch of sea salt
100 g (3½ oz) white (granulated) sugar
25 g (1 oz) cocoa
2 teaspoons finely grated orange zest
60 g (2¼ oz) salted butter, melted
125 ml (4 fl oz) milk
1 teaspoon vanilla extract

For the sauce
100 g (3½ oz) soft brown sugar
20 g (¾ oz) cocoa
300 ml (10½ fl oz) boiling water
60 ml (2 fl oz) whisky
40 ml (1¼ fl oz) orange juice

To make the sponge

Preheat the oven to 170°C (325°F). Grease an 18–20 cm (7–8 inch) round baking dish, 10 cm (4 inches) deep.

Whisk together all the sponge ingredients until smooth.

Spoon this batter evenly into the dish.

To make the sauce

Sprinkle the combined brown sugar and cocoa over the sponge mixture.

In a separate bowl, mix together the boiling water, whisky and orange juice and pour carefully over the sponge mixture.

Bake for 30 minutes until the sponge has risen and is firm to the touch.

Thursday, 16 May 2019

LOVE and Carrot CAKE.


I have been a little MIA for the past month and the reason is because of love. Well, a wedding to be exact but a wedding really is just a big ball of love so, I have been MIA because of love. And cake. Lots of cake.

Cake has been all I've thought about for the past couple of months and now the love birds are husband and wifey, I'm not quite sure what to do to fill my nights after work. No more cake testing or tasting or making. I'll tell you what... it was very fun to be back in a kitchen. I know it was just my own kitchen but I was making cakes with almost a kilo of butter in them and 15 eggs. I think our apartment must have smelt amazing to the neighbours all month long.

I made three cakes. A carrot cake with cream cheese icing, a rich chocolate cake sandwiched with dark chocolate ganache and iced in chocolate buttercream, and a vanilla butter cake layered with vanilla buttercream and rhubarb and vanilla jam. All topped with beautiful blooms on the day.


Sunday, 29 April 2018

Coca (Savoury Flatbreads) from Barcelona Cult Recipes

Coca, Savoury Flatbread from Barcelona Cult Recipes by Stephan Mitsch | salt sugar and i

The other week I had some friends over on a friday night and went a little crazy at the fancy grocery store near work buying cheeses and antipasto goodies. I over catered for three but I always seem to over cater when it comes to snacks. I’d rather have too much than not enough, I have nightmares of people leaving hungry.

What do you do with leftovers bits and pieces of an antipasto? sure, you can just eat them as is - delicious! But where’s the adventure in that?

I have also recently been sent a copy of Barcelona Cult Recipes by Stephan Mitsch and as much as I wish I could tell you a story of a time I went to Barcelona and fell in love with a dish and have now recreated it, I can’t. I’ve never been to Barcelona but that doesn’t mean I can’t appreciate their foods from afar which is what this book really does. The tapas in this book look incredible; croquettes with chorizo, meatballs with peas, pickled anchovies, stuffed potato balls, artichoke chips and stuffed piquillo peppers to name a few. There are definitely a couple recipes which sound a little adventurous for me...baked snails and mushroom stuffed pig’s trotter but the recipe that really caught my eye was the Coca, savoury flatbreads. They use up the leftover bits and pieces (perfect!) and are covered in garlicky herbed olive oil... um, yum.

Monday, 4 December 2017

banana, fig and walnut loaf cake from The Tivoli Road Baker

I've started this post I think about ten times by now. What I want to say is just not coming out right.

But here goes... for the eleventh time now...

I've been in a cooking funk for a couple of weeks. My mind has been elsewhere. When this happens I find I go elbow deep in a project. At the moment, it's sourdough and for the past few weeks I've been trying to master a simple loaf, I think I've got it but sourdough is a labour of love. It takes planning and time. You put so much effort in, folding, proving, shaping, proving, preheating your oven to very freakin' hot, turning your apartment into a sauna and then, to find a flat, very dense, pancake looking blob. It's like a stab in the guts. Although in saying all this there has been one recipe that has given consistent results each and every time, the Basic Sourdough recipe from The Tivoli Road Baker Cookbook. It's simple, reliable, clear, not too wordy and I like that it uses both white and wholemeal flours. Now, for those sourdough bakers out there, I am sorry but I am not sharing a sourdough recipe here today. Even though I think I've got it down pack now (touch wood) I am no way confident enough to share sourdough on the space just yet, I still cross my fingers and pray to the sourdough gods each and every time.


banana, fig and walnut loaf cake from Tivoli Road Baker | salt sugar and i

Thursday, 6 July 2017

Chocolate Oatmeal Coconut Cookies

An unnamed somebody told me the other day I don't use my kitchen-aid much... well humpf... I made these cookies and you (the accuser) ate them. Ha. Chew on them Chocolate Coconut Oatmeal Cookies why don't you!? - I say this in jest and lots of love :)

To be honest with you readers, I've missed baking. To say it hasn't been on the top of my list this year is an understatement and among other things I've been 'attempting' to plan a wedding (Oh gawd! less than 2 months!!). Planning is very hard when you're a non-planner. I am a non-planner.

But cookies.. I can make cookies.

Chocolate Oatmeal Coconut Cookies recipe | salt sugar and i

Friday, 23 December 2016

short but sweet - vanilla & almond crescent cookies

Last week I turned my apartment into a sauna. I guess you could say it was my way of doing a pre-Christmas detox.

For some idiotic reason I thought it'd be a genius idea to bake cookies and mince pies in my little kitchen on the hottest night in Sydney in 159 years. Am I mad? I'm starting to think so. It was so unbearably hot that I slept with an ice pack and Arthur didn't leave the bathroom tiles unless it was to play with the ice cubes I gave him to cool off. It took a good 2 days to finally feel the cool change... oh how I miss summers best friend - the afternoon southerly!

But amongst the heat I baked: what felt like batches and batches of Christmas mince pies - homemade mincemeat and all, panforte - which I've come to realise, I don't actually like eating but wish I could turn it into a scented candle, WP chocolate cookies - delicious but unexpected, gingerbread snowflakes - on the crispier side, vanilla and almond crescent cookies from Classic German Baking and also almond toffee that is my absolute weakness covered in dark chocolate.

A little late but I guess better then never, I thought I'd share a Christmas cookie recipe with you for any keen bakers out there wanting a last minute christmas gift or like me, have a shortbread christmas breakfast tradition. These little crescent shaped cookies are drowned in icing sugar and melt in your mouth. Perfect on Christmas morning with a cuppa in pyjamas.

I wish everyone a wonderful Christmas and hope their day is full of all the best things... good company, great food and lots of laughs. Stay safe my lovelies x

vanilla and almond crescent cookies | salt sugar and i

vanilla and almond crescent cookies

recipe from Classic German Baking by Luisa Weiss (ever so slightly adapted)

175g plain flour
120g butter, at room temperature
250g icing sugar
100g blanched ground almonds or almond meal
2 tablespoon vanillezucker/vanilla sugar * (or super fine caster sugar + 1 teaspoon vanilla extract)
1 egg yolk
pinch salt

- Put the flour, butter, 50g of icing mixture, 1 tablespoon of vanillezucker/vanilla sugar (or caster + extract), ground almonds, egg yolk and salt in a bowl of a stand mixture with the flat paddle attachment and beat until all ingredients are combined. If making by hand, place above ingredients into a medium bowl and combine using a had mixer on low and then bringing the dough together with a wooden spoon at the end or mix entirely with a wooden spoon.

- Split the dough into three equal portions and roll reach piece into 2.5cm thick cylinders. Wrap in cling film and place in the fridge for at least 1 hour or up to 24 hours.

- Preheat oven to 165C/325F and line 2 baking trays with baking paper when you are ready to bake.

- Remove logs from the refrigerator and slice each log into 12mm slices. Roll out each slice until it's about 5cm long and the ends are tapered but not pointy. Place on prepared trays and repeat with remaining dough. Space the cookies about 2.5cm between them on all sides.

- Bake for about 10 - 15 minutes or until ever so slightly browned on top.

- While the cookies are baking, mix together the remaining icing sugar and vanillezucker/vanilla sugar (if using) in a shallow bowl. When the cookies come out of the oven, let them cool for only a minute or two and very carefully dredge them completely in the sugar. Cool the dredged cookies on a wire rack and if still sticky, dredge a second time in the sugar to get an extra powdery coating.

- The cooled cookies can be stored in an airtight container for up to 3 weeks.

*vanillezucker/vanilla sugar
2 cups granulated white sugar
1 vanilla bean, cut into quarters

Place all ingredients into a food processor and blitz until the vanilla bean is finely ground and well distributed, the sugar should be powdery/very fine. Store in an airtight container indefinitely.

Tuesday, 21 June 2016

Blondies - a cross between a chocolate chip cookie and a brownie.

Jack Frost has taken leave this winter in Sydney. I haven't had any icy mornings or crunchy grass and winter has been here for officially 3 weeks now. I think the weather is drunk. Crazy storms one weekend (like swimming pools falling in the ocean) and then humid the next. Where is winter?? Jack Frost where are you??

Since Mr Frost has taken leave I've not had any desire to cook wintery comfort food yet. Instead all I've thought about it blondies. What are blondies? They are like a poor mans brownie since they have a whole bunch less chocolate in them but still just as good or more traditionally, a vanilla version of brownies. They go perfect with a morning coffee, delicious heated up so the chocolate chunks go molten with a scoop of vanilla ice cream (in front of the fire - if you're lucky enough to get cold weather to warrant a fire) or if your a cookies and cold milk kind of foodie then these will blow your mind. To me they are a mixture between a really great chocolate chip cookie and a brownie.

Have I convinced you that you need these? I need them. If only there was more hours in the day and we were born with two stomachs, I could cook and eat everything I ever want in a day.

Instead, since it's the shortest day of the year, the winter solstice, why not do some night time baking and enjoy a molten blondie with some vanilla ice cream on the couch snuggled up tonight. Fingers crossed it gets a little frosty in Sydney!

blondies | salt sugar and i

*photo fail but since it's like a cross between a brownie and chocolate chip cookie - thought this was appropriate. Or click here to get your fix of 'blondie' images.

Blondies

adapted from Food52 & Cook's Illustrated 

100g macadamia nuts
215g plain flour
1 teaspoon baking powder
1/2 teaspoon salt
170g butter, melted and cooled
290g brown sugar
2 large eggs, lightly beaten
4 teaspoons vanilla extract
90g milk chocolate
100g dark chocolate

- Preheat oven to 350F and move trays to bottom wrack. Spread macadamia nuts onto large baking tray and bake for about 10-15 minutes. Transfer nuts to chopping board to cool, roughly chop and set aside.

- While the nuts are toasting, line a 13 x 9 inch baking pan/tin with baking paper, making sure the edges come up a little higher so you can lift the blondie out once baked.

- Whisk flour, baking powder and salt together in a medium bowl and set aside.

- Whisk melter butter and brown sugar together in a medium bowl until combined. Add eggs and vanilla and mix well. Fold in the dry ingredients using a rubber spatular, until just combined but do not over mix. Fold through chocolate and nuts then pour into prepared tin and smooth over the top making sure the batter is level on top.

- Bake for about 22-25 minutes, until top is shiny, cracked and lightly brown. Do not over bake! Cool on a wire wrack in the baking tin until room temperature (if you can last that long!). Remove from pan by using the overhanging baking paper and cut into squares and enjoy!

Friday, 10 June 2016

Homemade Monte Carlos + I heart Hunter Valley.

*warning. this biscuit recipe is so good. stop what you are doing and just skip to the recipe.

The weekend before last, I went away for a girls weekend to the Hunter Valley. It was filled with local wine, delicious and large amounts of cheese and of course, great company. Some of us drove down on the Friday listening to RnB Friday's, all on a giddy high from having the day off work... we were free!! (until Monday). And! we were heading to a farm that had a real fire place with logs of wood and chickens that laid eggs. To say we were slightly excited was an understatement.

I was a little too excited the night before and morning of and made two containers of baked goodies. Homemade Monte Carlos and Food 52's famous Blondies. I couldn't decide which one so ended up making both, I didn't think anyone would complain.


After we all survived the grocery shop and after everyone was still best of friends we arrived at our little farm house for the weekend and were greeted by cows and an over-friendly cat called 'Smudge'. I say over-friendly because he had a plan which we realised quite quickly; he was trying to butter us up to let him inside by the fire but after rolling in cow patties, eating a bird on our door step and strict instructions from the owners it best he stay outside. While it was still light we went to visit the chickens AND a mama cow and her calf. Ahhhhh we all squealed, you could tell we were not from the country. When the farm dogs tried to round us up like wondering cows we decided it was time to retreat inside and warm ourselves up with a cuppa and a Monte Carlo before we cracked open the champagne and cheese platter.


The first challenge of the weekend was not who could finish their tea first and start on the bubbles but to light the fire and keep it going. We had wood, we had kindling and we had a match. Yes. One match. Luckily we had a ex-Scout with us and a couple of tea-lights to help.

*i thought i told you to skip straight to the recipe!

The next morning we were up at sparrows fart to get ready for our early shuttle bus pick-up. Over cooked eggs (I'm useless at cooking eggs), buttered toast, milky tea, face on, hair done and the realisation of my jacket still sitting at home but I was ready to start tasting what the Hunter Valley was made of. My favourites were definitely Ernest Hill and Draytons, they were also the first two we went to so that could also why I remember the wines better then the rest. The last stop was the Vodka Distillery which was more fun for the novelty of flavoured shots in test tubes then exactly tasty. The chilli vodka blew my head off! It was home after that to start our fire again and warm our feet, luckily our late addition to the girls weekend brought more matches with her late on Friday night. Farm/life saver!


Being back to the usual grind of Monday to Friday now for 2 weeks, I cannot wait to escape again this long weekend. But if I can recommend anything, it's to make these Monte Carlo Biscuits this weekend. They are seriously good.

#freakinamazing #sososodelicious #betterthentheoriginal #sorryarrnotts #homemadewinseverytime #yumyumyumyumyum #iusedhomemadejam #bestbiscuitever #justdoit #makethemnow #whatareyouwaitingfor!? so.... why are you still sitting reading this??


If your not an Aussie and weren't brought up licking the centre out of these chewy jam, cream filled biscuits then you probably have no clue what I'm talking about. The Monte Carlo is an iconic Australian biscuit made by Arnotts which has been around since 1926 and in my opinion, this homemade version is going to change your biscuit making/eating life forever.

The honey, golden syrup and coconut in the shortbread gives it a really great caramelised, nutty flavour while the sweet sugary buttercream on the inside is tongue tingling against the tart raspberry jam. I used my homemade raspberry jam that I made a few weeks ago so I am slightly bias and probably love them even more because of it but you could use a store bought jam and still make one of the best biscuits you'll ever make.

They go perfect with a cuppa or even a glass of bubbles.


Monte Carlo Biscuits

adapted from Paul West, River Cottage Australia.

makes about 30 sandwiched biscuits

for the biscuit.
180g unsalted butter, softened
1/2 cup brown sugar
1 egg
1 tablespoon honey
1 tablespoon golden syrup
2 cups plain flour, sifted
2 teaspoons baking powder
1/2 cup desiccated coconut

for the filling.
raspberry jam, homemade or store bought
70g butter, softened
1 cup icing mixture, sifted
1 teaspoon milk
dash of vanilla

for the biscuits.
- Preheat oven to 175C/350F and line as many baking trays as your have with baking paper.

- Cream butter and sugar together until pale and fluffy. Add the egg, honey and golden syrup and beat until really well combined.

- In a separate bowl mix together flour and baking powder (really well) using a whisk. Add the coconut and then combine all the dry ingredients with the butter mixture stirring until everything is evenly combined and a soft dough forms.

- Pinch off about a teaspoon (roughly 10g) of dough at a time and roll into a smooth ball. Place on your lined baking tray about 3 inches apart. When you have filled one tray, press each ball down to flatten it then using a wet (must be wet!) dessert spoon smooth over the top, flattening it more and forming it into an oval shape, about 5mm thick. Using a fork, rough up the tops to give them a more traditional 'Monte Carlo' biscuit look.

- Once you have done as many trays you have/fit in your oven, you can start baking.
(I had to make mine in batches as this recipe makes about 60 halves and I only own 2 baking trays and a tiny oven)

- These biscuits will take about 7-10 minutes, depending on your oven so keep an eye on your first tray to give you a guide for baking. They should come out of the oven golden brown and smelling of the golden syrup and honey.

- Allow to cool on trays for about 5 minutes then remove onto wire racks to cool completely.

- When all your biscuits are baked, start on your buttercream filling.

for the buttercream filling.
- Cream butter until pale a creamy then add your icing mixture then your vanilla and milk. Beat on high until the buttercream is pale and fluffy.

- You can now start to fill.

filling your biscuits.
- No one is perfect so not all your biscuits are going to be the same size. Match them up in pairs as best you can.

- Your can fill these two ways:

The first way, spread about a teaspoon of buttercream onto one side of a paired biscuit and spread about half a teaspoon of jam on the other and press gently sandwiching them together.

Or the second way, put your buttercream into a small piping bag or sandwich bag and cut about 5mm of the tip/corner off. Pipe around the edge of one of your paired biscuits and a swirl in the centre. Spoon half a teaspoon of jam on the inside of your buttercream piping edge and on top of the swirl and press gently sandwiching them together.

(I used the second method to fill them as it seems to hold the jam inside a little bit better and I didn't want the jam to leak out everywhere during the car trip. BUT both ways will taste just as delicious.)

Tuesday, 10 May 2016

Rhubarb and Apple Galette with an all butter spelt pie crust.

Yossy Arefi from the blog 'Apt 2b Baking Co' recently released her first cookbook 'Sweeter off the Vine' but I am yet to get my hands on a copy (come on payday!). This hasn't stopped me drooling over the recipes and photos from it, you see I've turned into bit of a stalker. I've been reading all the reviews from other bloggers who have a copy and I have serious FOMO. So to try and fix my serious case of FOMO I decided to make a recipe from her blog instead to feel included in this online bake-a-long. Just to make you also have FOMO, you can see a trailer for the cookbook here and if you don't crave pie or blueberry cobbler after watching it, something is wrong with you.

Rhubarb and Apple Galette with an all butter spelt pie crust.

It was the perfect opportunity last weekend when I found a semi dodgy looking bunch of rhubarb (I think it was the last of the season) hiding in the bottom of our veg box. It was just asking to be turned into pie and when I saw the apple and rhubarb galette on Yossy's blog I was sold. A galette is a free formed tart where you pile the fruit in the centre of the rolled out pie crust and fold the edges over so a tart tin is not needed. It's rustic and in my opinion so much better than a traditional tart, you get more of the flaky pastry edges but not quite as much if you had made a pie so I think of galettes somehow in between a pie and a tart... kind of. Anyway, it definitely doesn't skimp on indulgence.

Rhubarb and Apple Galette with an all butter spelt pie crust.

The recipe starts with your favourite variety of all butter pie crust. I don't have a specific favourite so had a little search around for a recipe and found a rye pie crust from Food52 but couldn't find rye flour (I didn't try very hard) so decided to use spelt instead. Totally different flavours I know but I just went with it and I think I've found my favourite pie crust because boy oh boy was it good!

Rhubarb and Apple Galette with an all butter spelt pie crust.

You smoosh the cubed butter into fat discs so you end up with chunks of butter spotted throughout the dough, which when baked go all flaky and buttery and with the raw sugar sprinkled on top you get that sweet crunch. You can never go wrong with the combination of rhubarb and apple, it's always a perfect match. The tartness of the rhubarb works so well with the sweetness of the cooked apple and then the flaky buttery pastry... oh my! It is seriously good pie crust. Add a scoop of vanilla ice cream on top of the warm galette and you've lost me to this dessert forever.

The pie crust recipe makes enough for two galettes (or one pie) so I have a disk in my freezer just waiting for me to roll it out, fill it with fruit and bake it. I know what I'll be baking and eating this weekend - and I highly suggest you make this too. As in, now.

Rhubarb and Apple Galette with an all butter spelt pie crust.


Rhubarb & Apple galette


makes 1x 9-inch tart/galette
adapted from Apt 2b Baking Co by Yossy Arefi

1/2 recipe of all butter spelt pie crust (see recipe below)
225g rhubarb
1 large baking apple or 2 small apples
1/2 lemon
4 tablespoons caster sugar
1 tablespoon plain flour
1 vanilla bean
pinch salt
1 egg
1 tablespoon raw sugar

- Line a baking tray with baking paper and preheat your oven to 200C/400F.

- Cut the rhubarb into 1/4-inch by 3-inch batons and the apple into thin slices, no need to peel.

- Use a sharp knife to split the vanilla bean and scrape out the seeds. Combine them with the 4 tablespoons of sugar and using your finger tips rub the sugar and vanilla seeds together to evenly disperse them.

- Roll out the pie crust till it's about 12-inches in diameter then transfer onto the lined baking tray. Sprinkle the flour and 1 tablespoon of the vanilla sugar over the top, leaving a 2-inch boarder around the edge. Arrange your rhubarb batons and apple slices in the centre, overlapping each other and keeping the 2-inch boarder. Sprinkle the remaining vanilla sugar along with a pinch of salt and a squeeze of lemon juice over the top of the fruit.

- Fold your boarder of excess dough over the fruit and press gently to seal the fold. Put the whole thing in the freezer until the dough is firm, about 15 minutes. While the galette is in the freezer, whisk your egg up in a small bowl.

- After the galette has chilled, brush the edges of the dough with the beaten egg and sprinkle with the raw sugar. Bake until deep golden brown, about 35-45 minutes.


all butter spelt pie crust


makes 1 pie or 2 tarts/galettes
adapted from Food52 article by Yossy Arefi

170g plain flour
170g spelt flour *
250g unsalted butter, chilled and cubed
1/2 teaspoon salt
1 tablespoon apple cider vinegar
120ml ice water

- Combine flours and salt in a bowl. Using your fingers smoosh the cubed butter into smaller pieces, some the size of squashed peas and others the size of podded broad beans. Some of the butter will end up completely worked into the flour, thats ok but you want some chunks as this makes the pastry flaky - don't be afraid of the chunky butter bits, this is not shortcrust pastry remember.

- Combine the water and apple cider vinegar into a jug. Make a well in the centre of your flour and butter mixture and slowly pour about 6 tablespoonfuls of the water-vinegar into the dough while gently mixing. If the dough seems dry add a teaspoon more at a time (I added ended up adding all the liquid but this will depend on your flour). You have added enough water when you can pick up a handful of dough and squeeze it together easily without falling apart. Press the dough together then split into two discs and wrap in plastic wrap. Chill the dough for at least an hour (or overnight) in the fridge.

You can freeze the dough for up to one month wrapped in a double layer of plastic wrap and a layer of foil. You will need to thaw it in the fridge until completely defrosted before use.

*I found spelt flour in the health food section of my local supermarket. You can also use all plain flour in this recipe if you don't have spelt flour on hand.

Wednesday, 6 April 2016

Torta di Mele (apple cake) from 'Florentine' by Emiko Davies.

Over the weekend I escaped my apartment and went to my mums to mess her kitchen up instead, plus she has a dishwasher which makes the clean up sooo much more pleasant. I gave dad the option of Bomboloncini (donut holes) or Torta di Mele (apple cake), both recipes from Emiko Davies new cookbook Florentine. Although I gave him the choice I knew before I even asked that he'd choose the apple cake, I was secretly hoping he would pick the donut holes but since I'm a good daughter I made the apple cake for him and will have to save donut holes for another day.

Torta di Mele apple cake | Florentine | Emiko Davies | salt sugar and i

Florentine, wow. It is such a beautiful book. The cover is stunning and the photos inside transport you to the streets of Florence, Italy. Emiko has some snaps of the inside of the book on her site, so beautiful. It made me want to max out my credit card and buy a plane ticket but instead I am just going to have to bring Florence to my little corner of the world with her beautiful recipes. There are a few I cannot wait to try, of course the Bomboloncini (donut holes) I keep going on about but also the Polpettone alla Fiorentina (Florentine meatloaf) and the Pane Toscano (tuscan bread). I have a soft spot for meatloaf so can't wait to try it and tuscan bread... who doesn't love freshly baked bread?? The smell of it straight out of the oven is mouth watering but then again so was this apple cake.

Torta di Mele apple cake | Florentine | Emiko Davies | salt sugar and i

About 20 minutes after I put it in the oven we could start to smell the buttery goodness and sweet apples and it instantly made us hungry and eager for it to be finished. Still warm we had a piece with a cuppa and it was the perfect combination. The sweet apple on top and inside the cake was so delicious. I think the cake recipe would also work folding through mixed berries, its a lovely and buttery cake that isn't too sweet so works perfectly with the added fruit. It reminded me of a cake my Aunty made but poured sweetened mixed berries, heated up like a runny jam over the top when I went to visit years ago. Between four of us we managed to polish off the whole cake while drinking tea and playing rummicub late into the night.

Torta di Mele apple cake | Florentine | Emiko Davies | salt sugar and i

A little tip to keep in mind, the recipe says '2 large apples' and I used 2 small to medium sized apples thinking it'd be ok but I recommend using large apples, mine could have done with more apple on the inside in some slices. And don't be too alarmed when the mix starts curdling, it did this to me when I added the eggs to the butter but I turned the speed up and it seemed to come together until I added the milk which then made it curdle even more. My eggs and milk were cold though so I don't think it would have curdled if I had warmed the milk slightly to take the chill off, same for the eggs. But as soon as I folded the flour through it all came together perfectly, no dramas.

My mum has a dream oven and it baked so much better than if I'd baked it at home, it was evenly golden on top and didn't have a half burnt side. Such a great afternoon/morning tea recipe with a cuppa or two.

Torta di Mele apple cake | Florentine | Emiko Davies | salt sugar and i

Torta di Mele (apple cake)

recipe from Florentine by Emiko Davies.

2 large apples, peeled, cored and sliced into approx. 1cm slices
1 lemon, juice and zest
125g unsalted butter, softened
180g caster sugar
3 eggs (at room temp)
150ml milk (at room temp/lukewarm)
300g plain flour
1 teaspoon baking powder
a pinch of fine sea salt

- Preheat oven to 180C/360F and line a 23cm/9inch cake tin.

- Place the apple slices in a bowl with the lemon juice and 2 tablespoons of the sugar.

- Beat remaining sugar with the butter until pale and creamy, add the eggs and beat very well until you have a thick, pale mixture. Add the milk and lemon zest, then fold through the flour, baking powder and salt then half the apples slices along with all the lemon juice to combine.

- Pour into prepared tin and place the remaining apple slices all over the top of the surface, Bake for 1 hour, or until the top is golden and springy to the touch.

Note: As this cake isn't overly sweet, Emiko suggests brushing the top with some apricot jam for a little shine and that extra bit of sweetness as an option for those of us who love things on the sweeter side.

Friday, 15 January 2016

Mexican Wedding Cakes and bringing in 2016.

A belated Merry Christmas and a Happy New Year to everyone!

Over Christmas and New Years I ate and drank my body weight in food, bubbles and lychee martini's, times about a billion. My clothes feel like they're busting at the zippers and I have an extra layer to keep me warm for these stupid humid days Sydney has had this week. But it's a new year so that means a fresh start. I have a whole list of new years resolutions which I have written down on a scrap piece of paper and stored it in my laptop case in hopes no one will find it and see the long list I have written for myself. I'm am excited for what this year holds but there is a niggle of doubt I keep feeling now and then that I can't shake. What if I get to the end of the year and feel the same as last year which was to be honest... meh.

Mexican Wedding Cakes | salt sugar and i

Last year was a year of meh... I turned 27 and I didn't want to. I flat out wanted to skip it and stay 26 for another year then jump to 28 next year, good plan don't you think? 27 is an ugly number (sorry to everyone else who is also 27), I think I dislike this specific age also because I'm not where I thought I would be at 27. I know I know! Expectations aren't everything but I think it's a hard thing to come to terms with when you think you'll be somewhere and then you arrive at 27 and you are no where near it. But I know 27 isn't that bad in reality, if anything getting to 27 and realising there is more I wanted to do by now has given me a kick up the butt to get a move on. I've made a 'before 30' list.... scary!!

Mexican Wedding Cakes | salt sugar and i

One thing that came of 2015 is that I started enjoying baking and being back in the kitchen again. It could have been because I stole my mums stand mixer don't plan on giving it back or it could also be because I no longer work in a commercial kitchen. Do I miss working in a commercial kitchen? honestly... some days yes but mostly I'm glad thats not me anymore. Will I ever go back? maybe, maybe not but definitely not yet. Do I still love food and cooking? yes and if so, even more than before. Am I ready to find what else is out there? for sure! But what I want this year is not to worry about what I do to pay the bill and try to focus on what I do with my time. I want to live outside more, get my hands a little dirty, not worry about the small things, spend less on things I don't need, be grateful with what I have and enjoy my time with those around me, this world to so big and life is too short.

Mexican Wedding Cakes | salt sugar and i

Ah what a rant!

I originally started writing this post to share these Mexican Wedding Cake biscuits I made for work colleagues as a Christmas gift but seem to have got very side tracked in it being a new years rant and all that sha-bang. I also made these biscuits again the other day because when I first made them I only got to eat one (ok maybe 2) to make sure they were as delicious as Jessica from Sweet Amandine said they were. I adapted the recipe slightly but I think I did her proud. They are little balls of nutty shortbread coated in a thick dusting, actually more of a coating of icing sugar that practically explode when you bite into them. They are nutty and not too sweet. There isn't that much sugar in the biscuit itself but it's when you coat them in icing sugar while they are still warm is where the magic of these cookies happens. It starts to melt into a layer which coats the whole cookie, then you dust them a 2nd time for that pretty white snow-like look. The trick is to not touch them until they are completely cool, I put them int he fridge for 5 min.

Mexican Wedding Cakes | salt sugar and i

The first time I made them with toasted pecans but then when I made them the other day I burnt the pecans in the oven so made them with almonds instead. Both were delicious but I think I'm a pecan girl. I'm wondering if toasted macadamias would also work well, I'll have to give them a go and keep you posted. These make wonderful little gifts and go amazingly well with a cup of tea at about 3pm or really any time of the day, breakfast included.

Life's too short to not make and eat these little morsels of goodness, even if it does mean that the button on my jeans take a little longer to do up.

Here's to 2016 and it being less meh than 2015!!

Mexican Wedding Cakes | salt sugar and i

Mexican Wedding Cakes

makes about 40
(recipe adapted from Sweet Amandine)

225g butter, softened
70g icing sugar (plus approx. 250g extra for the sugar coating)
2 teaspoons vanilla extract
250g plain flour
1/8 teaspoon ground cinnamon
130g toasted and ground pecans (or almonds)

- Beat the butter, 70g icing sugar and vanilla until pale and fluffy, scraping the sides down to make sure everything is mixed well together. Then beat in the flour and toasted, ground pecans (or almonds) until well combined.

- Divide the dough in half and form each half into a ball. Wrap in cling film and refrigerate for at least 30 minuets or overnight. (If you chill the dough overnight you will need to let it sit at room temp for about 20-30 minuets before you can scoop it, but don't let it get too warm. It should be cold but scoop-able.)

- Preheat your oven to 180C (160C fan forced) or 350F and line a baking tray with baking paper. Then place your 250g of extra icing sugar into a bowl or pie dish.

- Now it's time to get rollin'! Remove one half of the dough from the fridge and using a level tablespoonful of dough for each cookie, roll it into balls using the palms of your hands and arrange them about half an inch apart on your lined baking tray.

- Bake for about 15-17 minutes, until the cookies are a flush darker on top and are golden brown on the bottoms. Cool the cookies for about 5 minuets on the baking sheet then toss them in the icing sugar then place them on a cooking rack. Do this to all the warm cookies then toss them in the icing mixture a second time to give them an extra coating. Repeat with the remaining dough.

- Wait until the icing sugar coated cookies are completely cool before storing (I placed the warm dusted cookies in the fridge for about 5 minutes to set the sugar coating). They will keep for up to a week in an airtight container - if they can last that long!

Monday, 6 April 2015

Plum crumble for two.

Happy Easter everyone!

This long weekend has been 4 days of being a hermit inside and lots and lots of eating. Even though the shops were closed most of the weekend it hasn't stopped me cooking and eating... as I write this there is a chocolate pie chilling in the fridge, waiting to be dressed in vanilla whipped cream (blog post to come soon). It's been a rainy weekend and all I felt like was comfort food.

Plum crumble adapted from Nigella Lawson.

At about 7 o'clock last night, I decided I wanted dessert. But on Thursday night after work when everyone was raiding the local supermarket before the long weekend like they were stocking up for a zombie apocalypse I avoided the shops. This meant I was stuck with what was in my cupboard until they reopened which was the basics of basics. 

So what do you do with fruit that is over ripe, the scrapings of the butter, some sugar, flour and oats? Make a crumble of course!!!

Plum crumble adapted from Nigella Lawson.

So rich and decadent for such simple ingredients and I got to use my new little pots.

I adapted Nigella Lawson's recipe 'Jumble-berry crumble' from Nigella Express but used plums instead of berries. There was probably an excessive amount of crumble on top for two and could have been split over 3 ramekins but it was still the long weekend so why not indulge and over eat?! (I am sure next week I will crave salad, salad and more salad).

Plum crumble adapted from Nigella Lawson.

This dessert is also great to prepare in advance for dinner guests. Just bung it in the oven about 40 minutes before you want to eat dessert. It's super simple too, all I did was cut the plums into wedges and divide them between the ramekins, mix them with 1 teaspoon of raw sugar then top with the crumble mix. You can also freeze the crumble mix in zip-lock bags (if you make too much or want to double the recipe) so you have crumble in seconds next time. You can also substitute the plums for different fruit or a combination of fruits. Apple and plum is a delicious combo!

Plum crumble adapted from Nigella Lawson.

I hope this simple but indulgent recipe satisfies your craving for comfort desserts on a rainy night in or impresses some dinner guests. Serve with some good quality vanilla ice cream and you can't go wrong!

ps. I'm pretty sure I could have bribed the zombies with this crumble and would have definitely survived the apocalypse. 

pps. Can you see it? Can you see it??? new name :)

Plum crumble adapted from Nigella Lawson.

Plum Crumble for two.

Serves 2 greedy people
(Recipe adapted from Nigella Lawson's Nigella Express cookbook. Find original recipe here)

For the crumble:
80g plain flour
1/2 teaspoon baking powder
50g unsalted butter, cold and diced
20g rolled oats
3 tablespoons of raw sugar

For the fruit:
5 small plums, cut into wedges
2 teaspoons of raw sugar

- Place the fruit into two ramekins then mix one teaspoon of sugar into each. Set aside.

- For the crumble mixture; place the flour and baking powder in a bowl and rub in the diced butter using you're finger tips until you have a lumpy sand texture. Stir in the oats and sugar until combined then divide the mixture on top of the two ramekins.

- Bake in a 180C or 350F pre-heated oven for about 30-40 minutes or until the fruit starts to bubble at the edges and golden on top.

- Serve with some good quality vanilla ice-cream. Enjoy.

Tuesday, 31 March 2015

New York Cult Recipes - Brownies.

Brownies.

Brownies.

Brownies.

It's all I see.

Brownies from New York Cult Recipes

For the past few weeks every-time I came across a post about brownies I went green with envy. It wasn't fair that their little squares of chocolatey goodness aka brownies were at arms length while my brownies were still in the form of chocolate, sugar and eggs.

I had to fix this.

Brownies from New York Cult Recipes

So I made brownies and they were delicious! I had thought about using one of the many recipes online that I kept coming across but thought why not add another one to the mix? I got this recipe from the cookbook 'New York Cult recipes' by Marc Grossman. I love this book and want to make nearly everything in it although I will admit this is the only recipe I have made from it yet.

New York | salt sugar and i

This book takes me back to my snowy 2 weeks in New York with a couple of friends. I want to go back so bad. It wasn't long enough. I get the same longing feeling when I read books set in NY, about bloggers living and cooking in NY, watch movies that are set in NY (probably just a fake background but still) and photos of food that remind me of NY. Maybe I have hyped it all up for myself and a New Yorker would look at this book and snob it off as nothing like New York but it still brings back memories and makes me wish I was back there now. Oh New York... why are you so far away?...

Back to the brownies... these are a gooden. Not overly sweet, but deliciously rich & fudge-like, easy to make (melt + mix = winner!), go great with a cup of hot coffee, are incredible warmed up with vanilla ice cream and best of all... I got to actually eat them and not just drool all over my keyboard.

Brownies from New York Cult Recipes

Here are some of what I have drooled over... Click at your own risk.

Gerhard Jenne's Bittersweet Brownies with Cranberries posted by Luisa from The Wednesday Chef, Ashley Rodriguez's Bittersweet Brownies with Salted Peanut Butter Frosting  also posted by Luisa from The Wednesday Chef, Dark, fudgy, muscovado brownies posted by Amelia on Bon Appetempt, Brownie Cookies with peanut butter frosting by Donna Hay and The 'I want chocolate cake' cake by Smitten Kitchen.

Brownies from New York Cult Recipes

Or there are these ones you can make... they are well worth the 35 minutes wait for them to cook in the oven.

Brownies from New York Cult Recipes


Brownies from New York Cult recipes.

Recipe by Marc Grossman.

125g unsalted butter
325g dark chocolate
25g cocoa powder
60ml sunflower oil
260g light brown sugar
1/2 teaspoon vanilla extract
3 eggs
3 egg yolks
150g plain flour
1/2 teaspoon salt
100g dark chocolate, chopped

- Preheat the oven 180C (350F).

- Melt the butter, chocolate and cocoa powder in a saucepan over low heat.

- In a large bowl whisk together the oil, vanilla, eggs and yolks vigorously for a few minutes. Trust me - It's well worth this little bit of arm muscle work out.

- Combine the dry ingredients and add them to the egg mixture, then stir in the melted chocolate mixture.

- Line a square cake tin with silicon/grease proof paper.

- Pour the batter into the lined tin.

- Bake for about 35 minutes. The top should look shiny and a little cracked but fairly solid in the centre to the touch.

- Try not to burn your mouth as you dive into hot decadent brownie. Best eaten warm so leave it for a about 1 hour then dig in.

...

#giveaway 15 minute meals 30 minute meals 5 Minute Food Fix A Common Table A Kitchen in the Valley A Modern Way to Eat Acquacotta Adam Liaw Alison Roman Alison Thompson almonds Amelia Morris Anna Jones Annie Herron Antonio Carluccio Anya von Bremzen apple apps Apt 2b Baking Co Artisan Sourdough Made Simple Ashley Rodriguez autumn avocado babies baby baby shower bacon Bake baked pasta baking Bali Barcelona Cult Recipes basil BBQ beans beef beetroot Bill Granger biscuits blondies Bon Appetempt Bowl & Spoon bread breadcrumbs broccoli brussel sprouts burgers burrito buttercream butternut squash byo cabbage cake calzone camping Carla Lali Music carrot cauliflower chicken childhood chilli chinese cooking chipotle chocolate chorizo chutney Claire Ptak Classic German Baking Classics 1 Classics 2 coconut Comfort Food cookbook addict cookies cordial corn cucumber curry custard Cynthia Chen McTernan Date Night In David Dale Delicious. magazine dessert Dining In dinner party nightmares Dinner: A Love Story dip doings Donna Hay Donna Hay Magazine dumplings easy egg eggplant Eleanor Ford Emiko Davies Emilie Raffa Emma Spitzer ENOTW Every Night of the Week Veg family Fast Fresh Simple Feast Feasting fennel fiction Fire Islands Five Quarters Flora Sheedan Florentine Food & Wine Food52 Fresh & Light Fress frozen dessert Fuchsia Dunlop galette Gatherings Genius Recipes Gennaro Contaldo Gennaro's Fast Cook Italian Gennaro's Italian Bakery Gennaro's Pasta Perfecto! german ginger gnocchi goats cheese granola Greenfeast gumbo Gwyneth Paltrow Happenings holiday home home-grown herbs How to be a Domestic Goddess hungry Hunter Valley ice-cream indian Indonesian Cooking involtini It's All Easy It's all Good jam Jamie Does Jamie Magazine Jamie Oliver Jamie's America Jamie's Great Britain Jamie's Italy Jane Hornby japanese Jenny Rosenstrach Jessica Fechtor Julia Turshen Justine Schofield. The Weeknight Cookbook kale Karen Martini kimchi Kitchen korean Kylee Newton LA Cult Recipes Land of Fish and Rice leek lemon lentils life Light of Lucia Link Love links long weekends love Luciana Sampogna Lucio Galletto Lucy Tweed Luisa Weiss Maggie Beer maple Marc Grossman Marcella Hazan Marian Burros Martha Stewart Matthew Evans meal planning meatballs meatloaf mess mexican Michael James Michelle Crawford mince mint miso Monte Carlos Mum's cooking mushroom mussels My Berlin Kitchen My Kitchen Year Naturally Ella new beginnings New York Cult recipes Nigel Slater Nigelissima Nigella Bites Nigella Express Nigella Lawson No Time to Cook noodles North West Island nostalgia Not Just Jam NotWithoutSalt oats omelette paddle pops parsley pasta Paul McIntyre Paul West Paulene Christie pea pecans pesto pickle pickles pie pizza Plenty Plenty More plum pork potato prawns preserving prosciutto pudding pumpkin quesadilla quinoa Rachel eats Rachel Khoo Rachel Roddy ragu rambles raspberry recipe rhubarb rice risotto River Cottage Australia romantic Ruth Reichl saffron salad Sally Wise salsa verde Salt Fat Acid Heat Samin Nosrat sandwiches Sara Forte sausage Save with Jamie schupfnudeln seafood sesame Seven Spoons Simon David Simple slow cooker Slow Cooker Central Small Victories Sophie Hansen soup sourdough Sprouted Kitchen starters Stephanie Danler Stir stir-fry stuffed sushi Sweet Amandine sweet potato Sweetbitter tahini Taking Stock Tara O-Brady Taste Tibet Tasting Rome thai Thai Food Made Easy The Art of Pasta The Best of Maggie Beer The Comfort Bake The Dinner Ladies The Little Book of Slow The Little Paris Kitchen The Modern Cook's Year The Modern Preserver The Naked Chef The New Classics The Tivoli Road Baker The Violet Bakery Cookbook The Wednesday Chef The Zen Kitchen thyme Tom Kime tomato tuna turkey tuscany Two Greedy Italians Two Red Bowls Valeria Necchio vanilla veal vegetables vegetarian Veneto vietnamese wedding wedding cake What can I bring? What to Bake and How to Bake it Where Cooking Begins Where the Heart is yoghurt Yossy Arefi Yotam Ottolenghi Yumi Stynes zucchini